
The SMS service on the Atomic platform has got some robust automations when it comes to incoming messages. These Automations can help you automate certain aspects of your SMS service like managing an unsubscribe list for email blasting, forwarding to an email, and much more.
There are 2 key elements to an Automation, a trigger and an action. A trigger allows you to let the automation know what to look out for and an action will invoke a set of preconfigured action. A trigger can have multiple actions, allowing you to build powerful automations.
To activate Automations, on the Atomic platform, navigate to Services > SMS and select the Service you want to Manage. Scroll down to the Manage Service section and toggle the Automation service ON to activate it.
Once the service has been activated, your end user can now start setting up automations in their User Portal.
Action
Actions define what the automation should try to accomplish once a trigger has been met.
There are currently several Actions available on the platform, and these are:
Updating an Address Book
This action enables you to automatically add or remove a contact from a specified Address Book. This is especially useful for opt-out or opt-in type of messages
Forward to Email
When enabled, this action will forward the incoming message to a designated email address. The sender of the email will always come from [email protected] and the body of the email will contain information about the incoming sms like from, to, time, message, etc.
When you toggle the Include SMS History to ON, the email that is forwarded will include the the last 15 previous conversation threads with the recipient.
This is especially handy if you are using our Email to SMS feature as well - you can now both send and receive SMS just like you could with an email!
Forward to a webhook
The platform can also send the information of the incoming message to a webhook that you define. This is a great option where you want to run workflows in your space and just need the information in a timely manner.
Your web-hook service will receive messages as per the below schema. The webhook is a RESTful service that enables your service to process the interchange of JSON formatted messages via HTTPS protocols.
{
  "to": "61456789012",
  "from": "61499888999",
  "timestamp": "2022-06-28 21:53:47",
  "type": "text",
  "message": "This is an incoming SMS test."
}
Sending another SMS
When this action is called on, you have an option to:
- automatically reply to the recipient that sent the text message
- forward the text message to a another mobile number
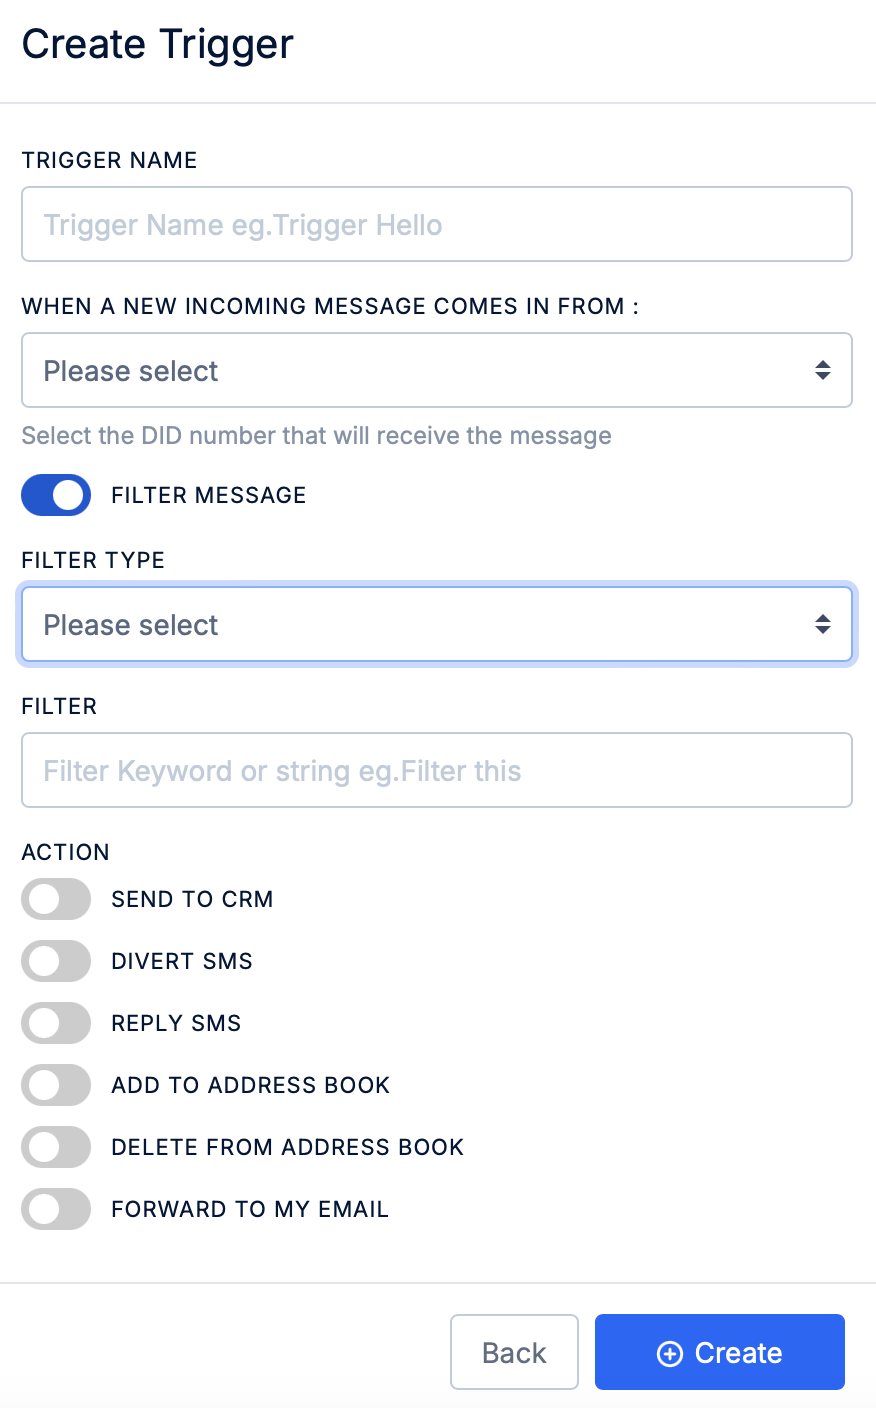
Trigger
When you first create a trigger, you will need to select which Virtual Mobile Number (VMN) you would like to associate the trigger to. You can create as many triggers as you would like for a single VMN. Each time an incoming text message arrives, the platform will go through all associated triggers for the VMN and will execute them accordingly.
You can optionally setup the trigger to filter by what content is within the incoming text message. If you toggle ON the Filter Message button, you are then able to select an option whether the text message contains a certain word or phrase, or equals a specific content.
You can then select the relevant Action that you would like to perform should your criteria be met. You can select 1 or many actions for this.
Examples
Manage Opt-In's and Opt-Out's
When sending campaigns or sms blast, it is best to use an Address Book for all contacts that you want messages delivered to. This will enable you to solicit a response from the user whether they would like to opt-in for more message or opt-out.
Example Outgoing Message
“If you would like to continue to receive these type of content, reply to this message with
Yes. If you want to stop receiving these messages, replyStop.”
Opt-In
- Create an Action and select the Address Book action type.
- For Action, select
Add - You can then select the Address Book where you want to add the contact who opt’s-in to this campaign.
- Now, you’ll need to create a Trigger and ensure that the correct VMN number is selected. This would be the number that was used to send the original message.
- Turn ON Filter Message
- Select Equals
- In the Filter field, enter
Yes. This will instruct this trigger to only process messages that has the wordYesin their message. IfYesis not found in the message, it will stop processing the message and not do anything else. - Select the Action that you want to run, in this case, the Action created in step 1.
With this Trigger and Action configured, if the incoming text message is
Yes, the process will add the contact to the specified address book
Opt-Out
- Create an Action and select the Address Book action type
- For Action, select
Delete - Select the Address Book where you want to delete the contact from. This is usually the Address Book that you had originally selected when sending the sms blast/campaign.
- Now, you’ll need to create a Trigger and ensure that the correct VMN number is selected. This would be the number that was used to send the original message.
- Turn ON Filter Message
- Select Equals
- In the Filter field, enter
Stop. This will instruct this trigger to only process messages that is exactly beStopin their message. IfStopis not found in the message, it will stop processing the message and not do anything else. - Select the Action that you want to run, in this case, the Action created in step 1.
With this Trigger and Action configured, if the incoming text message is
Stop, the process will try and locate for the contact within the specified Address Book and if the contact is found, it will delete the contact from the address book.